What's the connection between servo selection, and a brief how-to regarding the classic silk-and-dope model airplane finish? As occasionally happens, we detour through the unexpected coincidences of life before reaching an answer. It began simply enough with an email asking . . .
Q. Which servos do you recommend for a Great Planes Christen Eagle II biplane?
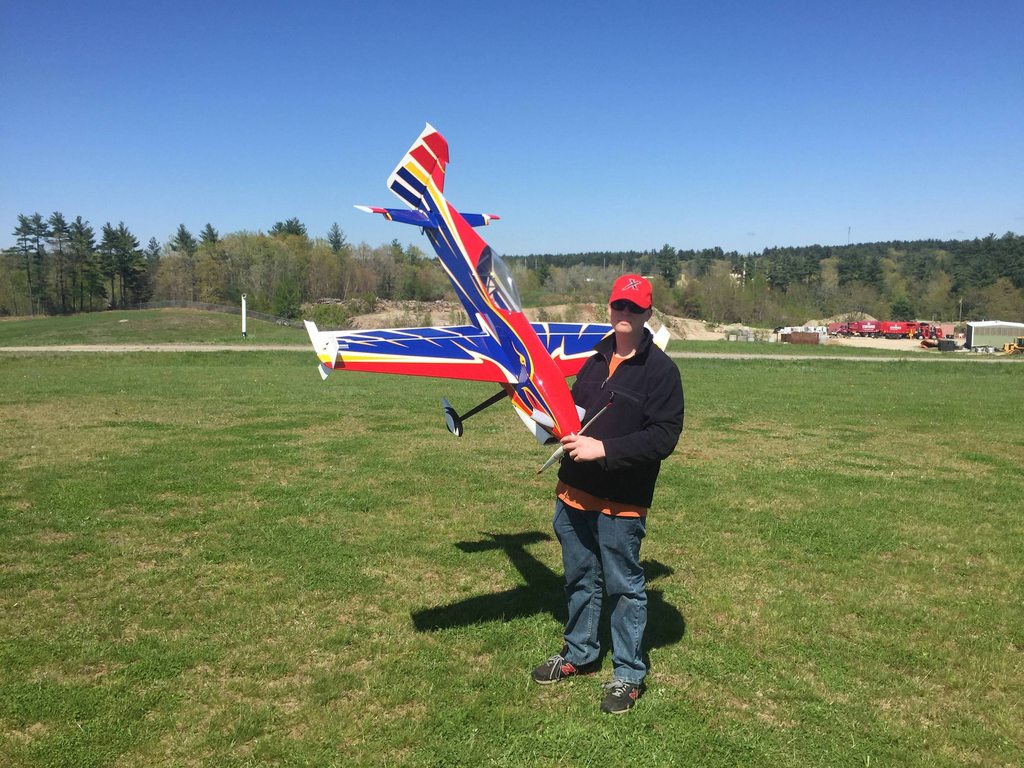
A. As it happens, I reviewed this 29% ARF for modelSPORT in 2003 and I still got the similar size sister to this model, the Pitts Special. mine is equipped with a 50cc engine. Anyway, this size biplane flies great and for mere mortals engaged in sport-maneuvers, all that's needed are eight DS90DLHV servos (four on aileron, two on elevator, plus one each on throttle and rudder).
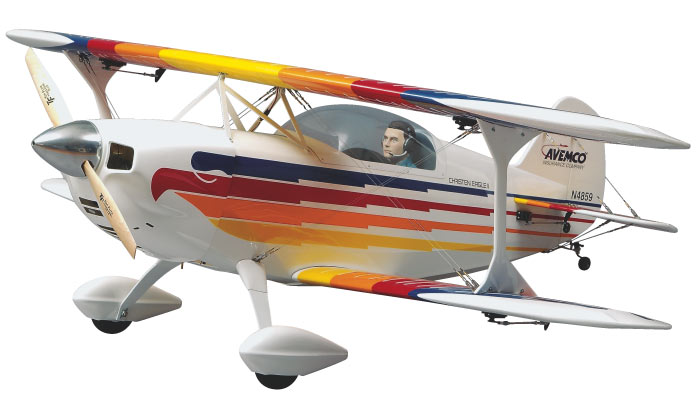
- Now discontinued, this Great Planes model is lovely with a 50cc twin
Variations on a theme, or how mini-class servos fit the story
I answer variations of the above question regarding which servos are best for such-and-such a model every day, and that should have been that. This time we took a different path, but before I continue, and in anticipation of queries regarding the now discontinued Eagle and Pitts models, let me point you to a very suitable alternative.
If I stuffed mine in the ground tomorrow, because it's so much fun I'd replace it with the lovely PAU 27% Pitts Challenger. A hair smaller at 27%, this model is also designed for 40-50cc engines and while I'm partial to the all-red Oracle version, PAU offer one trimmed in yellow as well.
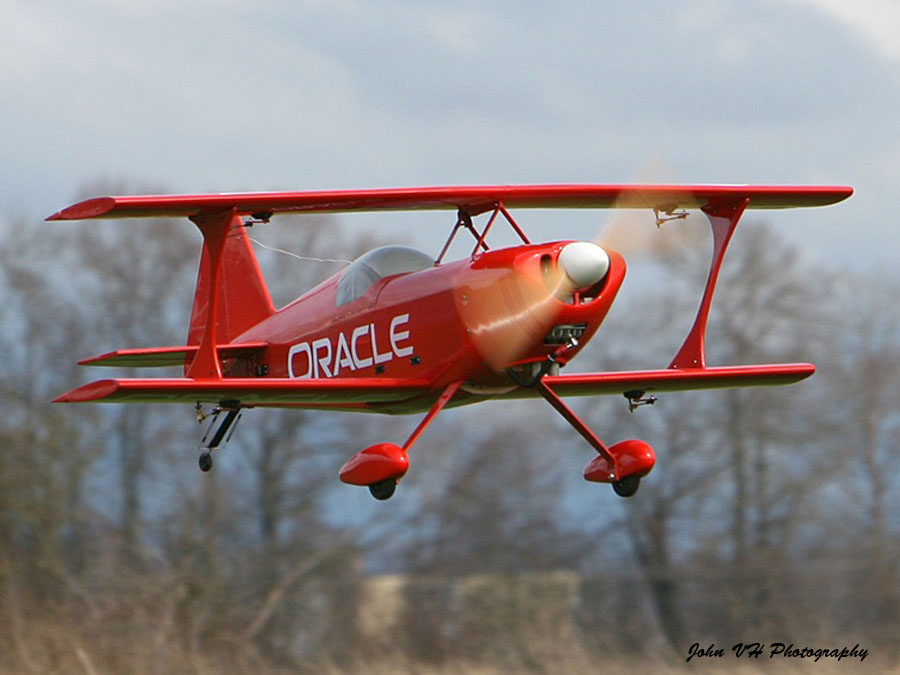
- Super maneuverable this 27% PAU Pitts Challenger is a gorgeous 50cc ARF
So back to the story, things were going innocently enough when later that same day, buried within a followup message, I mentioned thoughts of taking my Pitts to another level by using DS160CLHV mini-class servos.
At 160oz-in, these are roughly 2X stronger, easily 3X faster, and come in at about 1/2 the weight. Since minis are more thrifty than standard size servos battery-wise, along with a lighter flight pack I'm thinking the smaller avionics package may shave nearly a pound off the AUW of the model, or enough for even a duffer like me to feel. Anyway, mini-to-standard adapters, part number PDRSM2S make using minis, instead, quite easy.
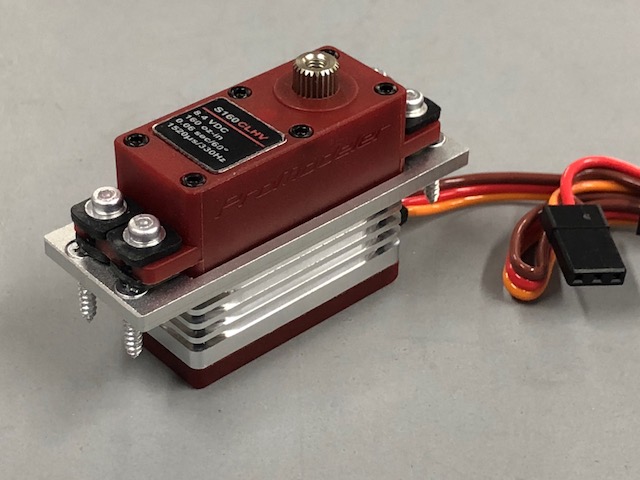
- aluminum screws because we're serious about weight loss also!
Not ten minutes later, ring, ring, it's the phone. Same fellow with more questions. We chat a while before an off hand comment regarding a black color scheme sparked a memory of a conversation from 15 years ago. Shortly after the review came out, a guy called seeking engine advice. That call was memorable because he shared his plan to strip the gorgeous white MonoKote/multi-colored feather scheme because he didn't want his to look like everybody else's Christen Eagle. Wanted black instead of white. Fact is, the Eagle scheme in black looks really sharp.
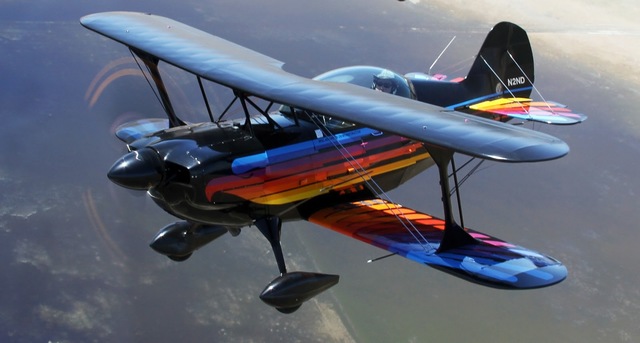
- Templates for the eagle motif were included with the experimental kits!
Anyway, it takes an individualist to buy an ARF professionally covered in MonoKote, only to immediately strip and redo it. This requires dedication and a certain panache. I immediately recognized a kindred soul and we hit it off. Anyway, for a while, he and I were speaking daily!
For example, once we detoured into using UltraCote instead because MonoKote because the latter can be a be-atch to trim without a ton of little bubbles under the feathers – or – by using a chemical activator for the adhesive. UltraCote, on the other hand, is dead-nuts easy to layer without bubbles. Somewhere along the way I half joking suggested using silk and dope. he did and it turned out gorgeous. As I related this, the call fell silent long enough for me to go, “Hello?” thinking the tower had dropped the call. Nope, the silence was the guy collecting his thoughts before blurting out a name. Same guy. His Dad. Small world, eh?
Silk-and-dope background
Fast forward fifteen years and I'd lost track of him. So I find myself explaining to the son some of what I'd explained to his Dad; basically sharing a few tips for doing old
fashioned silk-and-dope finish. His Dad had done a good job with my verbal instruction (subsequently sent pictures, but sadly, I've long lost them). Anyway, yesterday the son calls again; this time regarding details for repairing the covering. Mentioned some damage (old silk can be fragile). Basically, he needed to effect some repairs. Wondered if I could help if he visited and brought the model. Nope, no way do I have time, and sentiment aside, things around here are like Mach 2 with my hair on fire because we're working to finalize a new submicro servo.
Then hesitantly, he asked if I had any of the emails. Implied was; would I mind sharing the messages between me and his Dad (perhaps confusing me with a priest or a doctor regarding confidentiality)? Since I'm neither padre nor sawbones, I didn't think confidentiality applied. Especially because a) I didn't mind sharing and b) the other guy is dead so who would object? Naturally, I said, “Sure!”
On UltraCote and buying a new model
It helps I'm a pack rat and don't throw anything away - emails included. So I dug them up and forward same. And this brings us full circle to a few thoughts regarding how to
cover a model airplane using silk-and-dope - the classic model airplane finish – as promised!
I've put my notes in better order and this time, include a few thoughts about MonoKote vs. UltraCote. What got me started on this last bit? And why do the differences between the two popular film coverings matter? Well, it's like this; recently, I saw a very pretty model airplane online. Pretty enough to feel the urge to get one.
Frankly, this happens a lot but this one is special. It's a 69” Turbo Raven by Extreme Flight which has a bird motif. I really like the trim scheme. Folks, this thing is gorgeous (and it's an ideal candidate for our DS160CLHV mini-class servos because the designer is clearly playing the weight game to win).
- Playing to a genius level this top-designer means for this model to be light!
By playing to win I mean the designer, Cody Wojcik paid more than lip service to reducing the AUW. Moreover, he's obviously thinking outside the box else he wouldn't have considered minis for the application. In a word, he's very astute and fully groks the reality of what modern mini-class servos bring to the table in the way of performance. Frankly, this is a rare thing. I often refer to it as thinking around corners.
Gaston Glock did it when he created his Glock pistol using a plastic side frame. Now it's common because Smith & Wesson and everybody else offer something similar. He was first. Henry Ford thought around corners also when he created the moving assembly line. Now everybody does it. Anyway, believe me, this designer thinks outside the box!
Other designs in this size specify the safe choice, standard size servos. Yet Cody ditched those for mini-class servo. Why? Simple, it's because minis like our DS160CLHV and DS175BLHV have got the power and speed to extend the performance envelope of the aircraft whilst reducing weight. This is a big deal, believe me!
Meanwhile, I touched on it but the other thing I find irresistible about the Turbo Raven is the bird-pattern with which it's trimmed. It results in a relatively complex finish. There was, however, a question. Is it covered entirely with film, or is the trim scheme painted on? Painting trim film coverings are a shortcut I abhor. Enough so I won't buy a model done that way because effecting a proper repair is nearly impossible since the paint can't be easily matched. Once I confirmed it was done right (e.g. the trim is done in film), I ordered one. Note; Extreme Flight even makes it easy by sharing the UltraCote product codes for all the colors of the covering. Nice touch!
On how MonoKote came to dominate
UltraCote, of course, is a polymer film similar to MonoKote. For those not in the know, when Top Flite introduced MonoKote it displaced silk and dope from it's prominence as the preferred finishing technique of balsa wood flying models. This happened seemingly overnight but in reality, it took about a decade to effectively displace the old technique. When I became an RC modeler in the early 70s the process was well underway but because total dominance wasn't fully established until the late 70s, I cut my teeth with silk and dope. This, largely because my mentor was old school (gunnery sergeant with the Marines in Vietnam – he was my senior by 15-20 years). He was a very picky guy from whom I learned the importance of details.
Anyway, silk and dope was (and is) a tedious finishing process for model airplanes process (and my Mom hated the smell). The point being, making the switch to MonoKote didn't take a lot of convincing (for me or virtually every modeler of the time). Only now dead curmudgeons (like my mentor) persisted with silk and dope.
Note; to this day, a few modelers still do it, but it's a small number, perhaps fewer than 1% of models are done this way. The rest are covering in film. Or maybe silkspan attached with nitrate. Especially on models with fully sheeted wings (foam core wings were new back then also). Anyway, on models with no open spans between ribs, the paper covering (silkspan vs. genuine spider silk) was often color-sprayed with Hobbypoxy or Ultrapoxy instead of dope. Also far more laborious than MonoKote, this process was significantly faster than dope but different because epoxy is handled and sprays in a completely different fashion (and only needs two coats). Still a lot more work than MonoKote, but in common with silk, better looking . . . but I digress.
Thus, for the modeling masses, MonoKote was the no-brainer of all time. Basically, the whole job of finishing the model was reduced from weeks of tedium to a matter of hours. Then it was ready for the equipment install just like we do with ARFs today.
Anyway, like pretty much everybody else, after my first experience with MonoKote I never went back. In fact, I took to MonoKote like a duck to water because it was so much less work and looked good enough. Good enough means I could easily overlook the fact it wasn't as a nice looking as a well executed silk-and-dope job because I am somewhat lazy. You may be thinking, 'John, you're exaggerating and making a bit much regarding how much work was involved in silk and dope.” I'm not.
But in all honesty, sometimes - for the right plane - it's worth the effort. For example, his is orange silk finished in clear with cream trim and dark brown pinstripes on one of my Playboy models. When it floats overhead, the sun gleaming through the structure . . . it's magical, believe me!

-- Post war Playboy design is ideally suited to being silked
Silk-and-dope – the basic steps
Finishing a plane today is a matter of a few hours with a covering iron. However, once upon a time, it involved at least a week to 10 days (and two to three weeks wasn't uncommon with intricate schemes). A silk and dope job begins with brushing an adhesive coat of clear nitrate dope on the finely sanded balsa structure.
You have to apply dope everywhere the the silk will adhere on the perimeter of a panel. Every edge gets a light coat. Take special care to preclude runs (especially on the ribs). Then after it dries, proceed to fine sanding of the wood you've coated with dope using 400-grit wet. This is then followed by another light coat of dope. And this is the easy part!
Sourcing materials
Did I mention most wives (and my Mom as definitely a wife) hate the smell of dope? Whether it's nitrate or butyrate dope, it'll stink up the whole house. You can't even work in the basement! So the smell means finishing is an outdoor activity for most guys (summer or winter). Then there is drying time, a real time killer. Plus lightly sanding between coats everywhere silk touched the balsa structure. All while taking great care not to sand on open structure areas so as not to damage the silk's weave.
Where do you get silk? I favor old fashioned Chinese silk. Look online for Habotai 5mm weight class. I buy mine from Dharma Trading. Also, opinions vary regarding weight with some preferring the heavier 8mm silk - it's a judgment call. What about dope? There are two types, nitrate and butyrate. Note; it's important to realize butyrate can go over nitrate but not vice versa. You'll only screw this up once, I promise. Anyway, there are tons of sources for dope like Randolphs, Brodak, Sig, even the full scale suppliers like Aircraft Spruce. The internet can be your friend.
Tips and tricks – an overview
Both kinds of dope - nitrate and butyrate - have a purpose. Continuing from my notes; once the nitrate dope on the wood structure is dry, the next step involves trimming silk panels to size. Note, silk has a grain! The finished edge is the one that runs parallel to the span. Don't turn it 90° and use the cut edge for the span or it will sag in an unsightly way. This is a big deal, pay attention!
Anyway, after soaking the silk in water and wringing dry (don't get too aggressive or you'll have to wet the silk again with a spray bottle), the silk panels are laid in position (and wet silk can be tricky to deal with). Then you pull out wrinkles whilst spraying with 50/50 water-alcohol and using clear full-strength nitrate dope (and a brush) for tacking the silk down around the perimeter of openings or complete panels. Note; what's actually happening when you do this is fresh dope melts existing dope so when it dries, the silk is fused to both old and new the same way fiberglass is used with resin. E.g the dope acts like glue the silk makes for a strong flexible surface. Done right it's ends up tight like a drum!
What's important about all this? Do not induce a warp in the structure! And never allowing the silk to sag between ribs. Perfection is your goal and the Devil is in the details! By the way, there are loads of descriptions online for doing all of this; Google is your friend because remember, this is just an overview, OK? But ultimately, noting beats jumping in and getting started.
Anyway, once things have dried, a light sanding, plus more clear dope where the silk adhered to the wood to ensure it's well and truly stuck in place to the entire structure. This is de rigueur because if a silk panel pulls loose later you have to start all over. Plus take care to 'always' work with an eye to reducing the chance for a warp of the structure!
Anyway, once the perimeter coat dries and the silk is smoothly attached, you'll lightly brush a coat of 50/50 nitrate-thinner (clear again) on all the silk. This will shrink it when it dries. The point is to work evenly and on opposite sides at once to shrink the silk into place but not warp the structure. I keep harping on this because it's important. When doing a stab, for example I'll work on one half but do the top and bottom at the same time to keep it from working. Then I'll do the other half of the stab. Take your time! Also, it's critical to not allow puddles of dope to form on the underside of the silk at the open spans (e.g. between ribs or over open tail feather structures). This is
important because it will look like crap!
After again waiting for this to dry, it's time to inspect and correct any defects. Basically, you're looking for any imperfections. The goal is 100% wrinkle free. When you find a wrinkle, you correct it by slitting the length of it using a single edge razor blade, then pat the new seam down with a brush loaded with dope to make it lay flat until it dries. Sometimes you need small patches of silk to make repairs or clear up bad wrinkles. Have patience and stick with it until the job is 100% taut and wrinkle free.
Of course, there is always some light sanding between coats but by now you're using 600-grit paper (wet so it's almost akin to rubbing instead of sanding). Speaking of intentional cuts with a razor blade to deal with wrinkles, there are also repairs; like where you accidentally sand through the silk on a hard surface like a wing tip or rib. This is due to getting careless (sanding can be a mind numbing job). So at a minimum, beyond a skillful touch, silking involves a time consuming amount of detail work.
Break out the compressor
Finally, once the silk is perfectly attached, the real work began. First, maybe brush on another coat of 50/50 clear but more likely a coat of 50/50 clear mixed mixed with talc (to fill the weave). Add a few tablespoons to the pot of clear. Note; sanding this is perhaps the only fun part of the job. It makes tons of fine dust and the whole thing smells like a freshly changed baby's if you're using Johnson & Johnson baby powder as your source of talcum. I did and always like the mess I made with the fill coat.
Anyway, one that's been sanded smooth, you've well and truly killed a whole weekend with an awful lot of tedium involving doping, waiting for things to dry, plus sanding (and heaven help you if you sanded into the silk and fuzzed it up because this also weakens the silk - plus it has to be repaired). This will sound strange, but I actually liked doing it because I'd get into a zone and just go!
Finally comes a thin coat of silver. Yup, the first instance of breaking out the compressor and spray gun. Now we add a lot of clean up time to the job because the spray gun has to be disassembled and cleaned with thinner after each coat. Fortunately, these dry fast and if you're careful to not let paint dry on the spray tip you can get a lot done working from one wing panel to a stab or to ailerons, then rudder, then fuselage, etc until you're back to wing panels, and the cycle begins again. Once the weave is filled to your satisfaction, it's time to switch to butyrate for color coats.
Butyrate dope
Butyrate dope shrinks less than nitrate and is hot fuel proof to about 30% nitro and impervious to exhaust oil (back in the day, castor oil but nowadays synthetics which can be hard on a finish). Fortunately, if you're working on a model that will be powered by a gasser or an electric motor, you may elect to stay with nitrate dope the whole way because 'hot fuel proof' doesn't matter.
Note; the component in nitro-fuel fuel you're especially concerned about is the nitromethane but even the methyl alcohol can be an issue. Back in the day, my favorite brand of dope was by Pactra. Their Aero Gloss was what I liked and I used this exclusively for clear and for the color coats. However, I think they've gone by the wayside.
Speaking of doping, a 'good job' means a minimum of half-a-dozen color coats for a journeyman finish involving two to three white base coats on the silver, plus two coats for light trim colors like yellow, maybe a third for darker ones like red. Plus pin striping and all this followed by a couple coats of clear.
Note, the folks using candies and flake, especially if shooting flames, may have applied many more coats plus a half-dozen of clear (plus 'lots' more waiting for things to dry and sanding out to 800-1200 grit).
Finally, a few weeks later - after a compound plus wax job - your model airplane is ready for the field. So with respect to the question of is this a laborious process? The answer is unequivocal . . . heck yes!
Tips and tricks
I alluded to my Mom hating the smell. It's strong. Once you've been around it, dope has an unmistakable smell (I rather like it but that could have been fueled by a teenager drive to be contrary). Anyway, Mom hated it - her house, her rules, so I worked outside.
Also, depending on humidity you needed to learn a few tricks like working with banana oil to slow down the drying. In fact, there are lots of little tricks involved. I was fortunate someone took a shine to me and taught me a great deal. He was a pattern competitor and an artist with a spray gun, and importantly, meticulous to a fare-the-well.
Note; the guys on the pattern circuit back in the day flew very pretty airplanes (they even cleaned them meticulously between flights). These days you really only find this attention to detail amongst the control line crowd. Anyway, my friend and mentor is long dead and he never switched to MonoKote and because he never asked, I never told him I had (but I suspect he'd have been a little disappointed in me). Anyway, I switched to MonoKote. No regrets. Not real ones.
On actually using UltraCote
The point of all this being - yes Mildred, there's a point - when UltraCote came out, I found my skills with MonoKote let me adapt to using it quite easily. Not as easy, I am told, going the other way around, e.g. from UltraCote to MonoKote (been told plenty of time that if you're skillful with UltraCote there are tricks to learn before becoming equally adept with MonoKote). The latter is not necessarily harder but it's definitely different because it goes on at higher heat and is a lot more work to get around compound curves like wingtips.
Anyway, if you're still with me, I'll share this last bit and quit. MonoKote came along and made some guy a tidy fortune. What was a nice kit-business (nice but labor intensive because kitting models is a lot of work) changed Top Flite, the company. Basically MonoKote was a single product that made it different from all the other kit makers of the day - something of a one-trick pony ideally suited for widespread distribution.
Anyway, it was a better mousetrap at a time modelers were hungry for an easier way to finish a model airplane than the laborious silk and dope process. And believe me, with maybe four or five silk-and-dope finished models under my belt before switching to MonoKote, I could almost do it in my sleep! The point being, my thoughts regarding silk and dope aren't mere theory but something I know good and well how to do! And maybe because I know how much sheer work it involves, I give thanks to the creators of polymer films every time I cover a new model!
So back to what wound me about the axle with whether the Extreme Flight Turbo Raven is an all UltraCote finish or has sprayed panels . . . the thought of giving up UltraCote for a prepainted covering job didn't cut it with me. Yes, it would actually stop me from buying the Turbo Raven had that been the case. Hmmm, seems I've become the curmudgeons of my day!
Anyway, I'm glad the knowledge of crafting a good silk and dope job remains in my bag of tricks but I don't really miss it despite Chinese silk and various brands of dope remaining readily available. Polymer heat shrink film with color adhesive simulates the old fashioned silk and dope job well enough that from the 1970s it's totally dominated the field for finishing your model airplane. Deservedly so.
Competitors arrive
Nothing breeds copy cats like someone else making a pot of money. Competitors to MonoKote soon surfaced. From England there was Solarfilm. Horizon Hobbies has Oracover (a German product), which they rebranded as UltraCote. And now that Horizon has bought out Hobbico they own the two most popular products. Meanwhile, Solarfilm is all but defunct in the USA and perhaps England as well with the advent of ARF models.
However, the end result with any of the films is functionally identical. Anyway, applying UltraCote isn't the same as applying Monokote. While both are a heat shrink polymer sprayed with color adhesive and sold on a 6' roll, UltraCote shrinks and goes around compound curves better and at a lower heat. UltraCote is a tiny bit heavier than MonoKote but unless you're flying competitive free flight this probably doesn't matter (and in which case you'd be looking at other films that are lighter).
One downside of UltraCote is it's softer than MonoKote and thus, it scratches more easily. It's also got a slightly duller shine than MonoKote. Some like this better. Again, a judgment call. UltraCote is also easy to paint because paint adheres well. Just because I pooh-poohed painted trim doesn't mean I don't recognize there are times a places where painting the whole plane which has been covered in film sometimes makes perfect sense. As a wise old wag once said, it depends. Anyway, both UltraCote and MonoKote do a superb job of simulating a silk and dope job without the smell and in a fraction of the time.
Me? I use either interchangeably because to know one is to know the other (with just small adjustments of your technique). And both produce a decent finish. But there's no mistaking either for a good silk and dope job up close.
That said, the market has spoken and for the vast majority of us, film is definitely decent enough for most, me included - and coming full circle - I'm very pleased to learn the EF Turbo Raven model is 100% covered in UltraCote film. Fortunately, the saintly and long suffering Lynn won't object to my getting yet another model airplane. How do I know? It's because I once overheard her putting a snooty gal in her place at a party.
This gal was was definitely being snarky when she wondered out loud what it must be like to live with a man who has never grown up (referencing me and my 'toy' airplanes). Lynn, without missing beat drolly said, “I don't mind because his models have wings instead of legs plus he's always home at night.” You could have heard a pin drop because it was common knowledge that gal's husband (an advertising exec) was fooling around with one of their clothing line models on the side, but again, I digress.
Finally, if you're wondering, will I strip down the Turbo Raven and recover it in silk? Nah, not a chance! Comments, thoughts, questions? Fire away!
Resources
https://pldaniels.com/flying/b...
https://www.airfieldmodels.com...